Building Zero Counts

Note: You will find several edits from 1/27/19 below as I made dramatic changes away from a separate mobile theme to a fully responsive site.


Since launching Zero Counts in 2014, I’ve spent a number of hours overhauling the ‘Chunk’ WordPress theme into a design of my own.

In 2017, inspired by reading Huffington Post Highline’s ‘Millenials Are Screwed’ feature on iPhone X, I decided it was time for Zero Counts to introduce a mobile theme — an OLED-first one at that. (Also, I needed to beat Gruber at his own game.) But I had no idea how or where to start.

My workflow for editing Zero Counts’ theme consisted of searching for the theme’s style.css on my host, copying the file to my desktop, guessing the appropriate CSS changes, copying the file back to my host via FTP, and crossing my fingers.

Meanwhile, my day job was increasingly spent in Sublime Text, Sourcetree, Github, and leveraging a CI/CD (Jenkins) — most of which had been foreign to me months prior. I was learning the benefits of local testing, change tracking, and automated deployments.

In a fit of panic, I realized how risky it was to be iterating on the Zero Counts theme in production. Whoops!

With my desire to launch a mobile theme, so grew my desire to overhaul my development workflow. At the top of 2018, I got cracking.

Goals

  • Test locally
  • Track changes
  • Break out child theme
  • Create mobile version
  • Deploy automatically to production
  • Bonus: Develop on iOS

Tools

Theme Research

Before doing anything, I needed to get a bit more comfortable with how WordPress themes worked. WIRED’s Jake Spurlock kindly pointed me in the direction of WordPress.org’s theme documentation.

Local Testing

Luckily, the documentation also included details on setting up a local development environment.

More specifically, I needed to set up MAMP (Macintosh, Apache, MySQL, and PHP) on my Mac. This provides, among other things, a local MySQL database for a local WordPress install to read from. WordPress.org has a great article about setting up MAMP here.

Ultimately, I needed to:

  1. Download and install MAMP. (The free version should do the trick.)
  2. Set up MAMP Settings. (My set up show Apache Port: 8888, Nginx Port: 7888, MySQL Port: 8889, Web Server: Apache, Document Root: ~/Sites)
  3. Start MAMP and create a database. (From the phpMyAdmin, I created a database called zerocounts_net.)
  4. Download and install WordPress locally in ~/Sites/[site name].

Because Zero Counts has existing posts, I exported them from my production database on ZeroCounts.net. To import them into the newly created local database, from the WordPress dashboard:

  1. Click Tools
  2. Click Export
  3. Select ‘All content’
  4. Click Download Export File

An XML file with all of my posts was downloaded to my computer and ready to be uploaded to my local PHP database. With MAMP servers started, I entered phpMyAdmin, selected my newly created database, clicked the ‘Import’ tab, chose the XML file that was downloaded from ZeroCounts.net, and specified format: XML. This injected all of my existing posts (plus lot of other stuff) into the local MySQL database.

Finally, I had to update the siteurl and home fields in the new imported database’s wp_[suffix]_options table to point to my local site. These were both updated to ’https://localhost/[site name]’

At this stage, my local site had all of my content, but certainly didn’t look like Zero Counts. I still needed to inject my custom theme. Before that, I wanted to begin tracking changes.

Change Tracking

I won’t go into the technical details of git repositories (repos) as I’m still getting my sea-legs. What I will say is the primary use case is to see a log of code changes and comments associated with the commits for quick investigation, reversions, and collaboration.

Git repositories can exist locally and/or remotely. In the case of Zero Counts, I develop locally using the local WordPress install I configured above, commit (save with a comment to myself) my changes, then push (upload) those code changes and commit details to my remote git repository. I can then go to another device — say my iPad (more on this in a bit) — pull (download) those code changes and commits, and be running/viewing the same code locally on another device. Think of it as a very manually, albeit safe, way of syncing my website’s code between devices.

GitHub is seemingly the standard when it comes to remote git repositories; however, with a free account, one can only create public repositories. I.e. my code would be publicly viewable. Private repositories are available on GitHub to paid accounts starting at $7/mo. [EDIT 1/27/19] — GitHub now offers unlimited private repositories with their free membership.

As a hobbyist, paying for a private repo that I may not use frequently seemed silly. Luckily, there is a solution in Atlassian’s Bitbucket. For a novice like myself, seeing little difference between GitHub and Bitbucket, Bitbucket offers free private repositories and therefore a membership from me!

Atlassian also offers a robust Git GUI for macOS and Windows called Sourcetree. There’s some peace of mind using a single developer’s sibling software and service together. As a bonus, I already had some familiarity with Sourcetree from my day job.

With a Bitbucket account created, I downloaded and installed Sourcetree. I created a new local repository in directory /wp-content/themes/ titled [theme]-child, where [theme] is the name of my default theme. (This will make sense soon.) [EDIT 1/27/19] — I created a new local repository in directory /Sites/[site name]. I checked the “create remote repository” box and signed into my Atlassian account. This created an empty repository on my Bitbucket account for my entire WordPress child theme install.

[EDIT 1/27/19] — Now, before pushing the local repository to the remote repository, it’s import to ensure git is ignoring the file wp-config.php. This file contains the variables that point your WordPress install to the appropriate database where your raw content lives. Ie. The wp-config.php file on computer should be pointing to your local database while the wp-config.php file on your remote host should be pointing to your remote database. Sourcetree allows you to easily add wp-config.php to your .gitignore file by simply clicking the ”…” next to the file name in the File Status menu before your first push.

Child Theme

WordPress themes are great starting places. Chances are, a WordPress user will want to make changes to the theme’s style. With most themes, users can make small appearance tweaks (colors, fonts, etc.) using the simple Appearance editor. Some users many want to go a bit further with how their theme looks and begin digging into the actual CSS.

Some WordPress themes allow for custom CSS that overrides the default theme’s style.css via the Appearance editor. However, there may be bits of the theme that don’t exist within style.css and users will need to poke around in the theme’s many PHP files. This can be a bit overwhelming if you have no familiarity with code. If one is able to successfully make changes to the PHP files, be careful. Changes to themes are typically overridden with regular theme updates. Instead of editing the theme directly, one should create a child theme from the default theme.

In an FTP client, copy the contents of folder /wp-content/themes/[theme] into the new local directory /wp-content/themes/[theme]-child.

Open the new child theme’s style.css file and edit the initial comment as follows:

/*
Theme Name: [Theme] Child
Theme URI: https://domain.com/wp-content/themes/[theme]-child/
Description: [Theme] Child Theme
Author: [Your name]
Author URI: https://domain.com/wp-content/
Template: [theme]
Version: 1.0
License: GNU General Public License v2 or later
License URI: http://www.gnu.org/licenses/gpl-2.0.html
Tags: [comma separated tags]
Text Domain: [theme]-child
*/

With a child theme established, the child theme will adopt core PHP updates from the default theme without interrupting your CSS and miscellaneous PHP changes.

Responsive Design

[EDIT 1/27/19] — In the original version of this post, I detailed hacking WordPress JetPack’s mobile theme to offer up a drastically different look and feel of Zero Counts to mobile users. While novel, this provided some problems:

  1. Managing two different themes
  2. Drastically different UI elements between the “white” desktop site and the “black” mobile theme
  3. Spotty results when visiting from difference device types
  4. SEO incompatibilities
  5. Constantly dismissing JetPack mobile theme files upon JetPack updates

Turns out, the crew at JetPack does not recommend using the built in mobile theme. During some troubleshooting back and forth, their recommendation was not to use the built in mobile theme as it hadn’t been updated in several years.

I took this as a sign to rethink my mobile theme strategy and simply rebuild Zero Counts to be truly responsive. I decided that I must preferred my “black” mobile theme and would use this as the theme for all devices. I just needed it to scale between screen/window sizes. Luckily, there some pre-built open-source frameworks that provide easily controllable grid systems for truly responsive site design. I chose Twitter’s Bootstrap. Bootstrap includes plenty of bells and whistles, but all I wanted to leverage is the grid system — a system that allows you to place your content into a 12 column grid. This allows me to define specific elements to resize depending on a few common device screen sizes.

Adding the Bootstrap grid to my theme was as simple as downloading the compiled CSS and JS, copying the /css/ folder into my child theme’s directory, and invoking it by adding the following wp_enqueues to my child theme’s functions.php:

wp_enqueue_style( 'bootstrapgrid', get_stylesheet_directory_uri() . '/css/bootstrap-grid.min.css' );
wp_enqueue_script( 'bootstrap-script', get_stylesheet_directory_uri() . '/js/bootstrap.min.js', array(), true );

From there, I needed to add new HTML into some of my child theme’s PHP files.

In my index.php file, I wrapped my <div id="contents"> in the following:

<div class="row">
<div class="col-xs-1 col-lg-2"></div>
<div class="col-xs-10 col-lg-8">
…
</div>
</div>
</div>

The Bootstrap grid requires elements adhering to the grid to be placed in rows; hence, the first <div>.

The second <div>, <div class="col-xs-1 col-lg-2"></div>, carves out a “margin” in the first column for extra small, small, and medium sized devices; but on large devices to span the “margin” to two columns.

The third <div>, <div class="col-xs-10 col-lg-8"></div> — where my “content” lives — tells my theme to span the container containing my content 10 columns on extra small, small, and medium sized devices; but on large devices to span the content container only 8 columns.

So, on extra small, small, and medium devices, 1 column + 10 columns (+ the remaining 1 column) = 12 columns. On large devices, 2 columns + 8 columns (+ the remaining 2 columns) = 12 columns. My content is centered and tailors for difference device sizes.

Push Child Theme to Bitbucket

Now that I’ve added my child theme to my local repository, it’s time to push it up to Bitbucket.

I use the following terms remind me how to use git:

  • Commit: Save with notes
  • Push: Upload
  • Pull: Download (We’ll come back to this.)

Sourcetree recognizes the addition of the files I copied from my hosting server. In Sourcetree, I clicked the ‘Commit’ button, left a note such as “Initial commit”, checked the ‘Push to remote repository’ box, and committed. This committed (save with notes) and pushed (upload) the files to Bitbucket. The entire batch of files included the note “Initial commit” (or whatever comment I left).

From here on, any changes I make to the files in [theme]-child automatically appear in Sourcetree, ready for commits and pushes.

I try to make it a practice to commit any single change I’m satisfied with. Occasionally, multiple theme changes will be included in a single commit, because I’m human and forget to save and note every little thing I’m doing.

Automatic Deployments to Production

At this point, I was able to make changes and test locally. Once satisfied with my changes, I was able to commit and push these changes to Bitbucket for change tracking and safe keeping.

Now, if you are truly comfortable with your changes, you can set up an automatic deployment to your production server. Note that a safer practice is to set up a staging server to push to first. This ensures your changes are reflected to your liking on the web, saved in the event something detrimental occurs to your local server, and allows you to build on several changes before deploying to production. For Zero Counts, I feel safe with my only testing locally and pushing directly to production. The changes I’m making are usually minimal and the audience size doesn’t necessitate that I be coy about changes as they hit my site. I leverage my small readership for design feedback and make small, visible tweaks often.

Bitbucket includes a feature called Pipelines that will detect when changes have been pushed to my Bitbucket repository, triggering a push of the changed files from Bitbucket to my production server.

For a thorough step-by-step tutorial on setting up Bitbucket Pipelines with WordPress.org, look no further than Peter Brumby’s excellent article, ‘Continuous delivery for WordPress using Bitbucket Pipelines’.

To enable Pipelines, I needed to provided Bitbucket with my SFTP username and password.

  1. Sign into Bitbucket
  2. Select my repo
  3. Choose ‘Settings’
  4. Under PIPELINES, choose ‘Environment variables’
  5. Add SFTP username: Type variable = SFTP_username, Type value = [SFTP username]. Click Add.
  6. Add SFTP password: Type variable = SFTP_password, Type value = [SFTP password]. Check the Secured box. This will obfuscate the SFTP password on Bitbucket.com for additional security. Click Add.

Once I set up my SFTP login credentials as variables, I needed to write instructions for Pipelines to sign into my SFTP and copy the changes I pushed from my local repo to my remote repo ultimately to my SFTP, thus, to ZeroCounts.net.

Pipelines are controlled with a YAML (.yml) file. This essentially provides Pipelines with a set of instructions once a ping from a webhook is detected. (A webhook is like a push notification for servers.)

The YAML file for Zero Counts looks like this:

image: php:7.0.27

pipelines:
default:
- step:
script:
- apt-get update
- apt-get -qq install git-ftp
- git ftp push --user $SFTP_username --passwd $SFTP_password --verbose sftp://ftp.[host]/home/[username]/[domain]/wp-content/themes/chunk-child

The gist of these instructions allows Git to log into my SFTP and copy only the changed files to my production server. The aforementioned article by Peter Brumby explains these steps in more detail.

iOS Development

With having a mobile theme in place, I began thinking about how neat it would be to develop on a mobile device. This is far from perfect, but it’s gotten me out of binds a few times now.

A little app called Working Copy allows me to latch on to my remote Bitbucket repos, make changes to the files, and push those changes up to Bitbucket, thus triggering a deploy to my production server.

The free version of Working Copy can be upgraded to the Enterprise version. Bonus: The dark icon sticks around.

I wanted to be able to use a full iOS compatible IDE and wanted Coda to be that tool. After paying for Coda for iOS, I found I was mistaken. It doesn’t seem to offer the ability to latch on to remote git repos like the desktop app does. Someday…

Next

This whole endeavor was my January 2018 project. [EDIT 1/27/19] — The move to a truly responsive theme with Bootstrap was a December 2018 project. I’ve only recently been able to sit around and write this all out.

There are certainly steps I’ve missed and efficiencies to be found. If you are following along and find glaring issues or gaps, let me know. I’m happy to help and update this post. If you find issues with this process, I’m also all ears. The biggest potential issue being the lack of a staging environment. I’ll put that next on my docket. [EDIT 1/27/19] — My staging environment is complete. I tackled this during the Bootstrap work. It really only involved creating a password protected subdomain with a separate WordPress install and a re-configuration of my Bitbucket Pipelines. Maybe I’ll document this at a later date.


Mobile Theme

The above is all well and good for desktop theme development, but mobile proved to be a different beast.

I use Jetpack for WordPress analytics and my mobile theme. Jetpack comes with a default mobile theme that can be altered, much like the default WordPress theme. I installed Jetpack on my local install of WordPress from the local WordPress dashboard. The mobile theme lives at ~/Sites/[domain]/wp-content/plugins/jetpack/modules/minileven/theme/pub/minileven.

To set up the remote repo for the mobile theme, I copied the contents of minileven/theme/pub/minileven from my local WordPress install to a folder on my desktop. I then deleted the minileven folder and created a new local (+ remote) repo from Sourcetree named ‘minileven’ in /wp-content/plugins/jetpack/modules/minileven/theme/pub/ and copier the contents of the copied directory back into it. It seems a little redundant, but I wasn’t sure how to initialize the existing minileven directory as a local repo. Once the files were copied back in, I ran an initial commit to the remote repo. Now I was able to track changes to the mobile theme.

Remember the bit above about updates to WordPress themes not affecting the child-theme? Jetpack does not support child themes. After a Jetpack update, a customized mobile theme is overridden by Jetpack’s default theme. (I’m sure I can find what controls WordPress child themes, but that’s another project for another day.) Therefore, after accepting a Jetpack update, the custom mobile theme needs to be pushed back up to Bitbucket to override the default Jetpack theme that sits on the production server.

In this case, there are two types of deployments:

  1. Regular mobile theme updates (like my desktop theme updates)
  2. Replacing Jetpack’s default theme after a Jetpack update

Remember that YAML file I set up for desktop theme updates? A nearly identical set of instructions can be used to cover item 1. Item 1 is the default pipeline that will run with regular pushes to the remote repo.

For item 2, I needed to create a custom pipeline that I can manually trigger from Bitbucket. I cleverly named this pipeline “full-deploy-after-jetpack-update”. I only run this after a Jetpack update.

image: php:7.0.27

pipelines:
default:
- step:
script:
- apt-get update
- apt-get -qq install git-ftp
- git ftp push --user $SFTP_username --passwd $SFTP_password --verbose sftp://ftp.[host]/home/[username]/[domain]/wp-content/plugins/jetpack/modules/minileven/theme/pub/minileven
custom: # Pipelines triggered manually
full-deploy-after-jetpack-update:
- step:
script:
- apt-get update
- apt-get -qq install git-ftp
- git ftp init --user $SFTP_username --passwd $SFTP_password --verbose sftp://ftp.[host]/home/[username]/[domain]/wp-content/plugins/jetpack/modules/minileven/theme/pub/minileven

The difference between these pipelines is push vs init. Because the Jetpack update wipes out my custom theme, it also wipes out the git tracking sitting on my production server. The git files need to be replaced and therefore re-initialized. (Initialization is still a little beyond my full comprehension, but I basically understand.)

Now that I was tracking changes of the mobile theme, I could begin work on my OLED-first (black/dark) mobile theme. As of this post, it’s still a work in progress, but I’m pretty satisfied.

Cross-Network Play is "the Next Logical Step"

Matthew Handrahan, GamesIndustry.biz:

Epic believes that the same process is starting to happen in markets like the US and Europe, thanks in no small part to refinements and improvements made to the Unreal Engine. During State of Unreal, Studio Wildcard’s co-founders Doug Kennedy and Jesse Rapczak came onstage to talk about Ark: Survival Evolved on mobile, and announced that it was being ported for Nintendo Switch. Sweeney also mentioned the mobile version of PlayerUnknown’s Battlegrounds, which was first announced in November last year.

Another example is, of course, Epic’s own Fortnite, which Sweeney believes is “unique” even within the context of the larger trend; principally because the work Epic has done to make it possible will benefit anyone that uses the Unreal Engine.

“So that they can do the same thing,” Sweeney adds. “And that is build one unified game that runs on all platforms, that is the same experience everywhere, and is a social experience that you can play with friends across all of the different platforms.

“What we have is this one engine that’s supporting AAA production values and game sizes and content bases that runs everywhere. This is going to be a great setup for the games industry, because it means that now you don’t have a divide between casual mobile games and high-end PC and console games.”

For Epic, this all makes complete sense and will give Unreal Engine a massive leg up as a development tool.

I wrote about the need for cross-network play in my piece Sold on Cross-Network Play. Much of the piece — albeit not transparently — stemmed from my frustration of having to hook up my Xbox One to play Overwatch with my friends. It was extremely encouraging to learn that players of Minecraft and _Rocket League _would be able to share experiences between Switch, Xbox One, and Steam.

Sony claims that their reluctance of opening cross-network play is out of protection of their community. I think that is a fair stance, but is the Sony community any less toxic than others? I think the real fear is losing an amount of ability to lock in players to PlayStation 4. It’s the same case made for exclusive games and content, the latter I vehemently oppose.

Maybe it’s just the era I grew up in, but I believe in exclusive first-party experiences. Beyond the console wars which were somewhat steeped in technology battles as much as publishing and political ones, there is something to be said for the marriage of first-party hardware and software. Nintendo and Apple are prime examples this, creating unique and often stellar experiences by leveraging both sides of the stack.

Sony can hold their own when it comes to exclusives. It’s time to open the network.

Switch Ports Hamstrung by Mario Carts

Christopher Dring in conversation with Ralph Egas, CEO of Abstraction Games:

He continues: “Performance is not really the issue. The issue instead is in the size of carts. The 32GB carts are expensive, you shouldn’t be wanting to do that. So we need to fit everything on 16GB, whereas the standard game on PS4 is much, much larger. It’s a crazy ratio we’re talking about. However, thankfully, there are a lot of opportunities for reduction without changing anything anyone will notice. Another thing we can do is do a cartridge version and then do staggered downloads to make the game complete. That’s probably the hardest part. Finding all the new technicalities and quirks that you get with a new platform.

Interesting and somewhat encouraging that performance isn’t the primary challenge of porting to the Switch. Also encouraging that dual-layer DVDs — the ancient technology used by the PS2 and Xbox 360 — maxed out at 8.5 GB. (Apparently, Xbox 360 discs topped out at 7.95 GB.) Thus, I remain hopeful for Final Fantasy X and Kindgom Hearts ports.

Please forgive me for the headline.

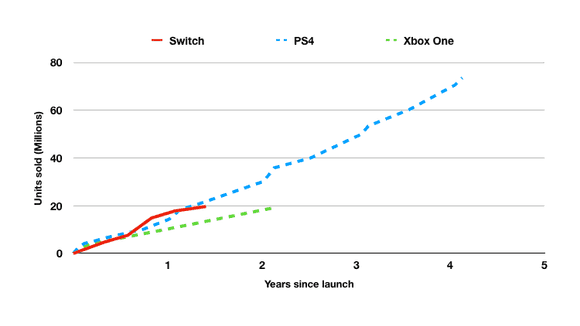
Nintendo Switch Is the Fastest-Selling Console in U.S. History

John Ballard, The Moty Fool:

The best-selling console ever is the PS2, which launched in 2000 and sold 157.68 million units over its life cycle, according to VGChartz. Sony shipped 10.61 million units in the first year of  PS2 sales.

Nintendo’s all-time best-selling game console — Wii — sold more than 4 million units within the first 10 months, and totaled 101.63 million units over its life cycle.

As for Switch, management says it expects Switch sales to reach 16 million by the end of Nintendo’s fiscal year in March 2018. That puts Switch way ahead of PS2, and on pace to be the best-selling console ever.

Big-N’s Big Year, indeed.